Android 13 (Retroid Pocket 5/Flip 2)
Android 13 (Retroid Pocket 5/Flip 2)
This guide is made for the Retroid Pocket Flip 2 and Retroid Pocket 5, but can be applied to almost all handhelds with Android 13. Some steps may be different but most of the steps will be the same.
I also tried to add some short explanations why i made some of the choices. This may also vary per device. Let me know if your experience is different!
Guidelines
For this guide I have determined some guidelines. I want to make a console-like experience and i think we can do it by following these guidelines.
- Use as many apps from the Play Store as possible and avoid sideloading
- No advertisements in the apps we are using
- Use as few apps as possible by using RetroArch for legacy consoles
- Try to use the A and B button as intended (Retro gamepad) as much as possible without switching to the Xbox controller style.
- This one is personal, but i like it if the games are stretched and fill in the whole screen
- Touch the screen as little as possible after setup (especially on the Flip 2)
1. Preparing your SD card
Before following this guide, You need to have a prepared SD card. The SD card needs to be formated as ExFAT. On this SD card you need to create at least 2 folders:
- BIOS
- Place your BIOS files in this folder. There is no need for subfolders in this one.
- For this guide you need the BIOS files for Game Boy, Game Boy Color, Game Boy Advance, PlayStation and PlayStation 2.
- ROMs
- Within this folder, place your ROM files in a folder per system. The name of the folder doesn’t matter as long als you can find it when you set up the emulators.
- Optional you can already place other files, like your save files or images on the SD card as well.
Disclaimer: I won’t share any of the needed files, such as BIOS or ROMs. Make sure you own the systems and games before using them on your handheld.
2. Setup wizard
The first time you power on your device it will show you a setup wizard. It will ask you for your language, region, wifi etc. You can follow this wizard with your own settings. If you get the question to use Google Services, turn this option to On.
In the final step (on Retroid devices) it will ask you to install some software under which the emulators. The apps in this section will be installed outside of the playstore and will be free, but mostly outdated. That’s why we skip most of them. However there is one exception.
Only select AetherSX2 for PS2 emulation here. At the time of writing there isn’t any other good PlayStation 2 emulator. I tried NetherSX2 (€ 6,99), and 2 others but the performance were less on the Flip 2, it has way more graphical glitches and it won’t work as good with Beacon (the launcher we are using for this guide). And let’s not talk about PPSS22 and DamonSX2.
3. Installing apps
After Android has launched it is time to install the apps we need. You will find the list including links and prices below.
- Launcher: Beacon Game Launcher (€ 3,39)
- Free alternative: Dajisho. Also works good, but it’s not as clean and i experienced some bugs in my short use. Can be used if you want to save some money.
- Retroarch (Free)
- I will use RetroArch for PlayStation, Game Boy, Game Boy Color, Game Boy Advance, Nintendo Entertainment System, Super Nintendo Entertainment System and DS.
- N64: Mupen64Plus FX Pro (€ 3,89)
- Free version is also available, no ads but some features are missing and you are supporting the developer with Pro.
- RetroArch can also emulate N64, but the performance is worse. Some games (like Donkey Kong 64) are not playable due to some bugs that can’t be fixed by the included cores and settings on Android.
- PSP: PPSSPP Gold (€ 4,99)
- Also has a free version without any differences, but this is a way to support the developer as well. It will also have a “Buy Gold” option within the menu.
- PSP can also be emulated through RetroArch but the performance is not as good and you are missing options to adjust this.
- GameCube and Wii: Dolphin Emulator (Free)
I also want to use Remote Play from my PlayStation. For this i use PXPlay (€ 7,49). It has a free competitor, Chiaki-Up but Chiaki-Up is missing a lot of features for customization and using the gamepad. It also has some translation issues so i think the fairly high price is worth it if you want to use this function. But again, if you want to save some money and don’t mind the touchcontrols, just go with Chiaki-Up.
4. Android settings
Most of the android settings can be adjusted to your personal preferences. However we have some settings that we need to make our Handheld life much better.
- Under Apps scroll to General and tap on Default Apps. Tap on Home app and select Beacon. This will make Beacon your default launcher.
- Under Notifications go to General and set Do Not Disturb to On. This will make sure you won’t recieve a notifaction while playing.
- This one is a little bit personal, but for the best look in the launcher and to spare some battery we need to turn on the Dark theme. Do this under Display and scroll down to Appearance. Set Dark Theme to On.
- On the same page, scroll down to Other Display Controls and find Auto-rotate screen. Turn it off.
- On the Retroid devices you will find Handheld Settings within the settings menu. Change the following settings:
- Under Power select Clean process when standy and turn the following options to on: Enable and Allow Clean Foreground Process
- Again under Clean process when standy select Ignored packages and select Beacon. After that press Done. Without this, Beacon will close every time you close the lid.
- Under Advanced, select Virtual RAM swap and turn on Swap 4G. This gives you a performance boost within PS2 emulation.
5. Notification bar
Lastly we need to set the settings within the notification area to the correct values. Open the notification bar by scrolling from the top of your screen to the bottom. Now repeat this gesture once more to open all options.
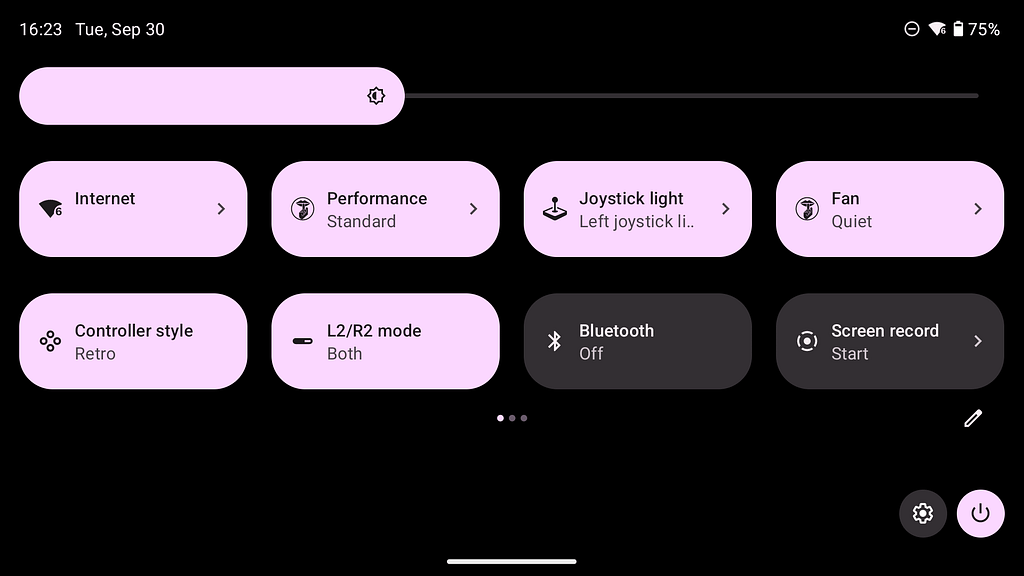
You will find very usefull options here like the Performance mode, Fan speed and much more. For this guide we will just check the options i think we need.
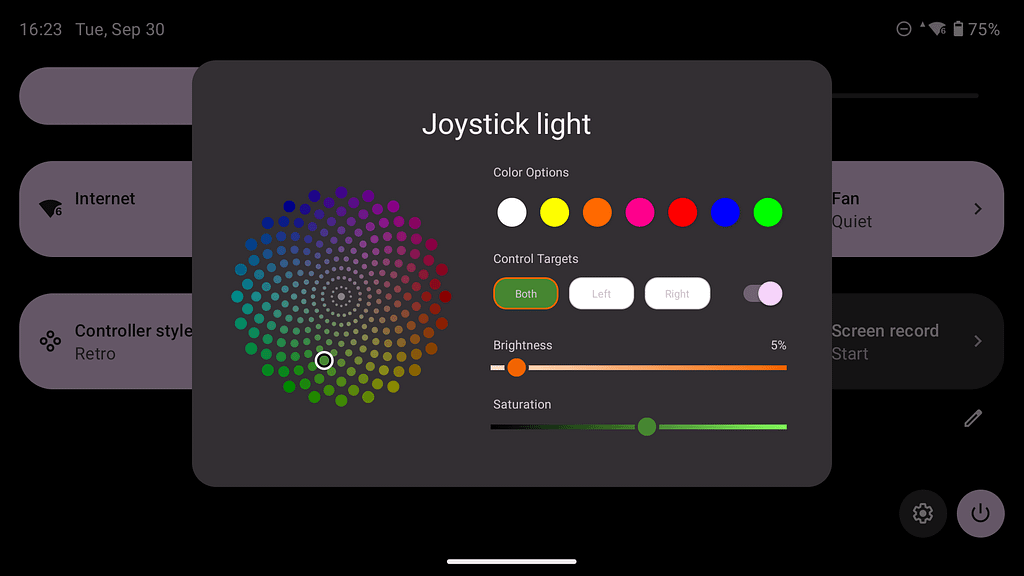
- Joystick light: This one is kind of personal, but i like to have them on, but not to bright and on the same color as my device. Tap on the icon to turn it on or off, and tap on the arrow to adjust the color.
- Controller style: Check if the control style is on Retro. You can change it here if needed after setup.
- Floating icon: If you scroll the option bar to the right you will find even more options. Select Floating icon and turn it off. This will hide the white bar at the right side of your screen. This bar has some usefull functions so if you need it just turn it on again.
- Force landscape: Scroll the option bar to the right again and find the option Force Landscape. Turn it on.
6. Prepare your emulators
6.1 RetroArch – General
The first time you open RetroArch it will load it’s content. You know when it is ready when the font changed from pixels to something modern.
First go to Online Updater and select Core Downloader. Download the following cores:
- MelonDS
- Gambatte
- mGBA
- FCEUmm
- Snes9x
- Duckstation
After that we need to load the ROMs. We just gonna add all roms as this is far more easy. Just go to Import content, Select Scan Directory and select your ROM folder. Now select Scan this directory.
Now we have imported all ROMs, look for the video settings, select Scaling and change the dimension to Full
Go to Input and change the following settings:
- Hotkeys
- Turn Close confirmation to Off
- Set Quit controller combo to Hold Start
- Almost at the bottom of the list, set Menu on/off to button 4 (Home button)
- Port 1 input
- Analog to digital type: Left analog stick
- Change A to the A button and B to the B button
- Now find the menu item Save controller profile and select it once.
Go to the Onscreen overlay
- Select On-screen overlay and turn it off.
- Go to Onscreen notifications and also turn it off.
Lastly, go to Saving and turn on Save State on close. If you like you can also turn on Load state automatically. I personally like to just start the game save, but if you always use save states this will start your game way quicker.
Go back to the configuration page and select Save current configuration.
As a bonus i really like the XMB menu. You can change it under User Interface and then Menu. Now select XMB. It only apply’s when you restart RetroArch, so don’t forget to Save the current configuration again!
After all that, you need to try a game from each platform (PlayStation, Game Boy, Game Boy Color, Game Boy Advance, Nintendo Entertainment System, Super Nintendo Entertainment System and DS). A Good moment to adjust some core specific settings!
6.2 RetroArch – Core specific
Most of the cores are just fine! i only advise to change Game Boy and Game Boy Color pallets, and change Nintendo DS to a hybrid function.
- For Game Boy: After starting the game open the Home menu. Now select Core settings and set the Internal Pallet to Game Boy Pocket.
- For Game Boy Color: Open the Home Menu in your game and select the Core Settings. Now set Color Correction to GBC only and set it to Fast.
- For Nintendo DS: Open the Home Menu in your game and select the Core Settings. Now set Screen Layout to Hybrid Top.
After all changes don’t forget to save the Core settings! You will find this in the same windows as the settings itself.
6.3 Mupen64Plus
Lets start with the easy one. Mupen64Plus is almost perfect out of the box. We only need to assign a ROM folder and change the controls.
- First add your N64 ROM folder by adding the + button. Now find your ROM folder and add it.
- Second, Check if the screen scaling under Display settings is set to stretch. Now go back to the previous screen.
- Third, Open the Touchscreen settings and set Button Opacity to 0%. This will hide the touchscreen controls. Again go back to the previous screen.
- And last, go to Profiles and select Controller. Now tap on Android Gamepad and select Copy. Now tap on your new profile and tap on Edit. First look for Z and assign L2 or R2 (or both). Now look for the A and B buttons and assign them to A and B.
6.4 Dolphin – GameCube
The first time you open Dolphin you can add games by clicking the Add Games button in the bottom right corner. Just select the correct ROM folder and add it.
- Then we need to set the controls. Go to settings and select GameCube input. Select the cog wheel after GameCube controller 1. Then scroll down to the buttons and assign all buttons to their corresponding buttons on your device.
- In most games you can also set the resolution to 2x. To do this go to Graphics settings, then Enhancements and then Internal Resolution. Change it to 2x Native.
Don’t close Dolphin yet. We need to setup the Wii part!
6.5 Dolphin – Wii
Repeat the Add Games function for your Wii games, and then go to settings again. Now select the cog wheel after Wii Remote 1.
- First scroll to Wii Remote and select Buttons. Assign all buttons without the HotKeys, and go back one screen.
- Now select Motion Simulation. Assign Up, Down, Left and Right to the same directions on your right thumbstick. After that, scroll down until you see Shake. Assign X to button X. You can press this button once to shake the Wii mote in your game. Now again go back to the previous screen.
- Select Motion Input, and assign Recenter to R3. Now you can reset your gyroscope by pressing R3 in game.
- Scroll down to Extension and select the cog wheel behind Nunchuck. Here you need to assign the C and Z buttons, as well als the Up, Down, Left and Right directions. Assign these to your Left thumbstick.
6.6 PPSSPP
This emulator is pretty good out of the box. If you open it the first time you need to select your PSP ROM folder. After that go to settings and adjust the following:
Controls
- Assign controls: Change Circle, Cross, Square and Triangle to their corresponding buttons
- Go one screen back and set Touchscreen controls to Off
6.7 AetherSX2
Setup is fairly easy. The first time you open AetherSX2 it will ask you for a BIOS file (select it) and the folder with your PS2 ROMs.
Controller settings
- Touchscreen
- Change Touchscreen Controller View to None
- Controller Port 1
- Select Automatic Mapping, it will map most of the controls
- Because we are using the retro bindings we need to change the Triangle, Circle, Cross and Square buttons. Select these buttons and assign the correct buttons from your gamepad.
System Settings
- General
- Save state on Shutdown: On
- Show Notifications: Off
- System
- Make sure Multi-Threaded VU1 and Instant VU1 are turned on
- EE Cycle Rate to 75%
- Graphics
- Scroll to Game Display and set Aspect Ratio to Stretch
- GPU Renderer to Vulcan
The settings under System and Graphics should make sure that most of the games are running pretty well, however it is still very game specific.
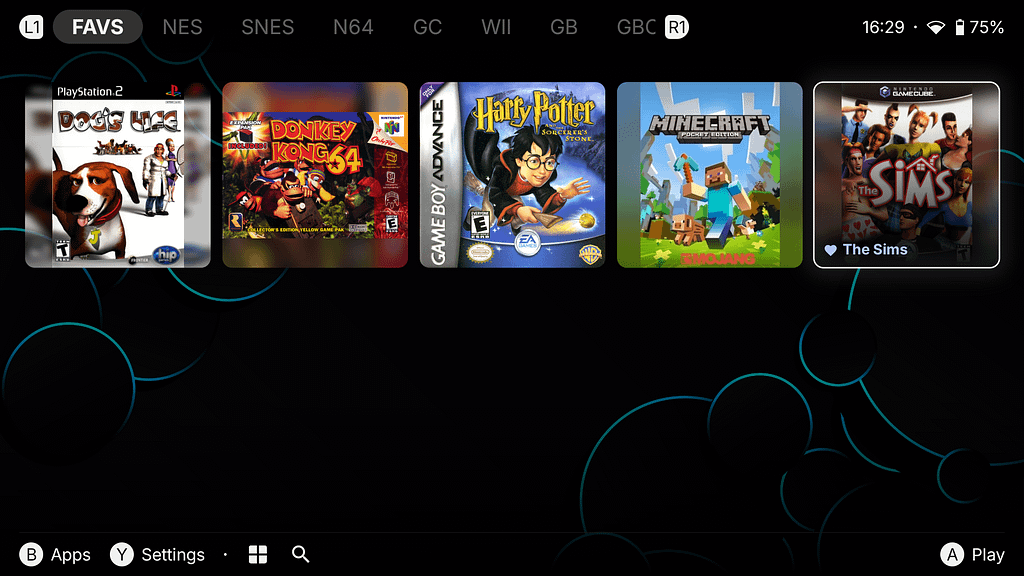
7. Setup Beacon
You’ve reached the final part! After this it is finally time to play some games. Beacon is very simple so it should be a fairly straight forward process. And the end result can be stunning if done correctly!
Open Settings and you will be on the Platforms page. Now click on the + icon. Here we will add the platform.
- First select the Platform Type
- Now select the Player (Emulator).
- If the emulator is RetroArch you need to select the Core you assigned in the setup of RetroArch
- And lastly select the ROM folder and click Save.
Repeat this process for every platform you want to add. It will sync your ROMs and boxart. This can take a while. If you enabled notifications it will show the progress in the notification bar.
If you have a Screen Scraper account, you can add this under Scraping and set it higher in the prio list. This will help scraping the images.
After that go to Preferences. This is very personal but i set it up as follow:
- Theme color: Azure
- Background style: Wallpaper
- If you want a android wide experience, also change this wallpaper in the settings of Android. This will make sure that you see the same wallpaper if you long press the HOME button.
- Game View: Grid
- Turned off Now tab
- Turned off Play Menu Sounds
After syncing is complete (and this can take a while). You can clean up the boxart. Beacon is very picky about the name, so sometimes you need to change the name of the file.
- First long press the ROM
- Now select Edit
- Change the name (only works after the sync is complete)
- Click on Save
- Long press and edit again
- Now press Scrape
- Click on save again
Some Android apps won’t have boxart within the scrapers. Here you can add your own image, or just leave the Android Icon as is.
And finally, you have completed the setup of your new handheld! Happy Gaming 🙂